This is a special occasion breakfast. I made these last Sunday and my husband wondered why I didn't put them on my blog. So, I made these again on Christmas morning just for him (well, OK to put on the blog too). You can make these to impress overnight guests or to treat yourself on a lazy Sunday morning. I usually serve these with maple syrup but I’ve also made blackberry syrup to drizzle on top. They are amazing with blackberry syrup or warmed up blackberry preserves.
This makes 4 nice sized servings.
Orange Marmalade and Cream Cheese Stuffed French Toast
3 large eggs
¾ C half & half
1.5 teaspoons honey
¼ teaspoon salt
¼ teaspoon vanilla
Zest of one orange
Juice from one half of an orange (fresh squeezed)
Pinch of cinnamon or cardamom (optional)
3 oz cream cheese
3 Tablespoons orange marmalade
Challah bread (can use French bread as a substitute)
Butter
Into a medium bowl, whisk together the eggs, half and half, honey, salt, vanilla, orange zest, orange juice and the cinnamon or cardamom (optional, I use a pinch of cinnamon).
In another small bowl, beat together the cream cheese and marmalade until combined.
Cut bread into 1” thick slices. Then, with a small sharp knife, make a deep pocket in the bottom of the bread (I cut a deep slit, enough to allow a large spoon in). Carefully stuff each piece of challah bread with 1 generous tablespoon of the cream cheese mixture. Place the stuffed bread into a deep sided casserole dish.
Pour the egg mixture evenly over the challah.
Let the mixture sit 5 minutes, then gently flip the bread and let the bread rest for another five minutes. The idea is to let the egg mixture soak evenly and deeply into the bread.
Melt butter in a large skillet over medium heat.
Cook the French toast until each side is well browned. Serve with a dusting of confectioners’ sugar or the syrup of your choice.
Friday, December 25, 2009
Monday, December 21, 2009
Butter Cookies
I'm giving Paula Deen and Ina Garten a run for the money in the butter department with this post. A couple of years ago, I took a holiday baking class at the Midwest Culinary Institute in Cincinnati. The teacher was one of the former owners of the Virgina Bakery. The Virginia Bakery was a Cincinnati institution on Ludlow Avenue in Clifton for many years. Sadly, it closed in 2000. This recipe was one of the recipes we learned to make. I like this recipe because it yields a large amount of cookie dough and I get to measure flour and sugar with my kitchen scale. Measuring with a scale is much more precise than measuring with measuring cups. Plus it is an excuse to acquire another kitchen gadget. This butter cookie has a wonderful, rich buttery taste. Great for your holiday party tray.
The recipe yields a whopping four pounds of cookie dough. I have no idea how many cookies you will get out of this recipe - it depends on the size and shape of the cookies you roll and cut out. The dough freezes well, so you could make a batch of this to have on hand for upcoming holiday events. Just divide it up and freeze it.
Butter Cookies
1 pound butter (4 sticks, unsalted butter, at room temperature)
1 pound sugar
2 eggs
2 t. vanilla
1 pound, 8 oz. all purpose flour
1 t. baking powder
1 t. salt
With a kitchen scale, weigh out the dry ingredients. Mix the flour, baking powder and salt together in a large bowl and set aside.
In a stand mixer, cream together the butter and the sugar at low speed for 3 minutes. Scrape down the sides of the bowl a couple of times during this process. Beat in two eggs and the vanilla.
Sift in the dry ingredients, one cup at a time until combined. Be careful, do not overmix the dough.
At this point, you can immediately roll the dough out and bake it. I prefer to shape the dough into a ball and refrigerate until chilled.
When you are ready to bake the cookies, roll the dough out onto a floured surface and cut into shapes. Roll the dough about 1/8" thick. I like to roll out a small amount of dough and cut out 4 -5 cookies at a time. Bake at 350 for approximately 10- 12 minutes or until the bottom of the cookies are light brown. Cool completely and frost as desired. I usually use Martha Stewart's royal icing recipe or a milk fondant icing to dip the cookies in.
The dough freezes well and will keep in the freezer for up to 8 weeks.
Monday, December 7, 2009
Millie's Turtles
You can't have Christmas in my house without homemade turtles. This is another recipe handed down from my mom, Millie. Of course, her turtles always turn out better than mine. I am getting better at the caramel - years of practice paying off. Don't be afraid to try this recipe. With the right tools, equipment and time, you can turn out beautifully delicious homemade caramel turtles.
First some tips and pointers:
Use a heavy bottomed pan. I use a great old copper pot that I got at an estate sale years ago. Copper is the best conductor of heat. Use the heaviest pot you've got, even a pressure cooker pot will do.
Also, use a good candy thermometer. You have to cook the caramel until it reaches the soft ball stage. You can't guess - it must reach the soft ball stage and you have to cook it s-l-o-w. Basically, you must stir and stir and watch the candy thermometer. When you think you can't stir anymore, when you think your arm is going to fall off, then you are almost at soft ball stage (approximately 238 degrees). Most good candy thermometers will have the soft ball stage indicated on the side.
Lastly, don't try to make caramel when it is humid out. Humidity is the death of good caramel - it won't set up. A dry day is best. Don't make this recipe on a rainy day, it really could affect the results.
This recipe makes about 40 nice sized turtles.
Millie's Turtles
Foil cupcake holders
Pecans
2 sticks of real butter (please do not even think of using anything but real butter)
2 C light brown sugar
1 can of sweetened condensed milk (I use Eagle Brand)
1 C white Karo syrup
12 oz semi sweet chocolate
Prepare the foil wrappers - separate about 40 foil cupcake holders and place on rimmed baking sheets. Spray each foil holder with a generous amount of nonstick spray. Place 2-3 large pecan pieces into each foil cupcake holder.
In a heavy pot, place 2 sticks of butter and 2 cups of light brown sugar.
Over medium heat, melt the butter and sugar. Just before the mixture begins to boil, add 1 cup Karo syrup and the can of sweetened condensed milk. Over medium heat, stir and cook the caramel mixture and bring it to a slow boil - stirring constantly. Using a candy thermometer, continue to stir and cook the caramel over medium low heat until the mixture reaches the soft ball stage. Do not rush this process, it will take over 15 minutes or so of stirring. Be careful stirring the caramel, it can burn easily.
Once the caramel hits the soft ball stage (238F), remove the caramel from the heat. Working quickly, ladle the caramel into the prepared foil cupcake holders. I use about 1/8 C. of caramel per turtle.
Let the caramels harden up and set (about an hour). Melt the chocolate chips over a double boiler and swirl a generous dollop of chocolate onto each caramel. Allow to firm up before placing in containers to store. Keeps at room temperature about a week or you can keep them in the fridge for 2-3 weeks.
On a holiday platter
Sunday, December 6, 2009
Peppermint Truffles
I love living in Austin so far. There is very little I miss about Cincinnati. However, there is no Trader Joe's in all of Texas - which is just WRONG. This time of year, I was quite bummed about not having any of their Candy Cane Joe Joe's.
These are special cookies that TJs produces during the holidays. They are a peppermint Oreo type cookie that are simply delicious. TJs only makes them available from late November to right after Christmas. In years past, I was not above stockpiling them in my pantry. I talked my sister into driving all the way across Columbus to buy several boxes and ship them down to me. Holiday crisis averted!
Last year, I made Oreo truffles during the holidays and decided to experiment with the recipe, substituting Candy Cane Joe Joe's for the Oreos. This recipe is so easy it is embarrassing. I call this my Sandra Lee moment - I'm almost ashamed to post it because it only has 4 ingredients.
You will be surprised at the taste when you make them, they are damn good and people love them. Plus, they look pretty and festive. Great to take to parties, give as gifts or surprise your co-workers.
Peppermint Truffles
1 box of Candy Cane Joe Joe's
8 0z package of cream cheese
12 oz bag of semisweet chips
1 o2 2 candy canes, crushed
Into a food processor, place about 2/3 of a package of Candy Cane Joe Joe's.
Break them into chunks for easier processing. Grind the cookies up until you have 3 cups of cookie crumbs.
Add 8 oz of cream cheese and process until well combined.
Line a rimmed cookie sheet with wax paper.
Using clean hands, shape the cookie dough into 1" balls. You should get approximately 36 balls. Place the cookie sheet into the freezer for about 30 minutes or so. You want the truffles to be hard enough to dip.
Meanwhile, over a double boiler, melt the bag of chocolate chips and crush the candy canes.
Working quickly, dip the truffles into the melted chocolate and dust with crushed candy cane. Place the truffles into the refrigerator and leave them there until almost ready to serve.
I like to store uneaten truffles in the fridge, so they stay fresh and don't get too soft.
Here they are on a holiday platter.
Thursday, December 3, 2009
Morning Smoothie
I make a smoothie every morning and have for years. A smoothie is quick to make and healthy. I am posting this recipe for all of those people who say things like "oh, I'd love to make a smoothie in the morning but I don't have the time". Seriously? You don't have the time? It takes like 3 minutes or less. If you can't spare 3 minutes in the morning, you are probably one of those jerks out on the freeway causing morning pile ups. Slow down. Drink a smoothie for crying out loud.
This is my basic recipe and you could vary this a thousand different ways. Measurements are a guestimate, because I normally just eyeball it. Don't get hung up on measuring for this recipe, there is no need. This recipe makes 2 servings.
Blueberry Smoothie
Into a blender, place all of the following ingredients:
1 C frozen blueberries (you can any fruit you like, but frozen berries work great)
2 C light vanilla soy milk (can use lowfat milk instead)
1 ripe banana
3/4 C light vanilla yogurt (I don't measure this, I just throw a big scoop in)
1/4 C ground flax seed*
Whirl the ingredients in a blender until smooth. Makes 2 servings.
*note - I sometimes use a couple of scoops of protein powder in place of flax seeds
Sunday, November 29, 2009
Homemade Granola 101
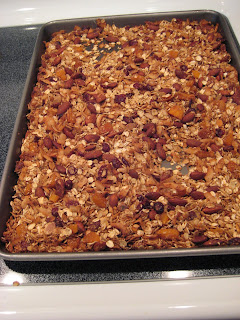
A couple of weeks ago, I bought an expensive bag of granola at the farmers market. It was $8 a pound - yes, I am insane for paying $8 for a bag of granola. I thought I could make it last by just sprinkling a handful on top of my regular cereal or yogurt. My husband, however, had other ideas. I think he used half of the bag in his first bowl of cereal. I almost fell down with shock when I realized how quick that bag of granola was going to last us.
I made granola years and years ago, I knew I could make granola cheaper than $8 a pound. I went out and bought a few ingredients to whip up a huge batch. I spent about $4 in the bulk foods section of the grocery.
This granola recipe is easy, healthy and delicious. It makes about 8 cups of granola and it will keep nicely in a sealed container for a couple of weeks.
Granola
3.5 cups of old fashioned oats - do not use quick cooking oats!
1 C whole almonds
1/2 C wheat germ
1 C unsweetened coconut flakes
1/3 C of pumpkin seeds or flax seeds (I used pumpkin seeds)
1 C dried fruit (I used 1/2 C dried cranberries and 1/2 C dried, chopped apricots)
1 T cinnamon
1 T vanilla
1 t salt
1/4 C vegetable oil
1/4 C honey
2 T maple syrup
Preheat oven to 350. Spray a large, rimmed baking sheet with nonstick spray.
In a large bowl mix together all the ingredients. Stirring to coat well.
Pour onto the baking sheet and spread out into an even layer. Bake at 350 for 20 minutes, stirring every 5 minutes or so. Watch this closely because the nuts will burn.
Allow to cool completely and store in an airtight container.
Serve with milk or yogurt, or by itself as a snack.
Saturday, November 28, 2009
Millie's Yeast Rolls
br
I have been eating these rolls for years. My mom has been making these for as long as I can remember. Be it a major holiday (Easter, July 4th, Christmas, etc.) or an exceptionally cold day on the farm, my mom would whip up a batch of rolls. These are especially good straight out of the oven when the yeasty, warm, steamy roll is really fresh. Also good the next day with a bit of butter, jam and a cup of tea. Because there are no preservatives (yah!), the rolls only stay fresh about 48 hours, but don't worry they won't last that long.
The great thing about these rolls is that they are fool proof - no kneading required. You only need to allow for the time to let the dough rise, that is all. I most recently made these on Thanksgiving Day. I tend to make them on major holidays or just because. They are also good with a ham or brisket.
This recipe yields a dozen good sized rolls.
Millie's Yeast Rolls
1 C. milk
1/4 C. shortening (use Crisco)
1/4 C. sugar
1 egg
1 packet of yeast (I use instant rise)
1/4 C. warm water
3 - 4 C bread flour - do not use all purpose flour, use bread flour
3 T. butter
1 t salt
In a large mixing bowl, place the sugar, shortening and salt. Warm up the milk in the microwave and pour into the mixing bowl. Cool to lukewarm. Meanwhile, sprinkle the yeast packet over 1/4 C warm water. Stir to dissolve. Let sit for a couple of minutes, you should see the yeast start to react and bubble a little bit, might start to look gluey.
*Make sure the milk mixture has cooled down. Then add the yeast mixture, 1/2 C bread flour and the egg.
Beat until smooth. Gradually stir in enough flour to make a soft dough (less is best, use about 3 - 4 C flour or less). You want the dough to barely be moving off the sides of the bowl when you stir it. Don't overwork the dough or beat it too long.
It should look spongy but not too stiff.
Cover the bowl with plastic wrap, then a kitchen towel and place the bowl in a warmish spot and let rise for at least 1 hour or until the dough doubles in bulk.
Picture above is of the dough after the first rise. It should double in size.
Spray a 9 x 13 pan or two pie plates with nonstick spray. Flour your hands and punch the dough down. Using floured hands and a large spoon, divide the dough into 12 rounds. Place each roll onto the greased pan. Cover the pan with more plastic wrap and a kitchen towel and let the rolls do a second rise for about 45 minutes.
Dough after the second rise.
Preheat oven to 400. Melt about 3 T butter, drizzle over the rolls and then bake in a 400 degree oven for 12 - 15 minutes. Tops should be golden brown.
Serve hot from the oven with plenty of butter and some good jam. Heaven!
Saturday, November 21, 2009
Beef Vegetable Soup
When I was growing up on a farm in the middle of nowhere Ohio, beef vegetable soup was a staple in the winter. I ate bowls and bowls of this stuff over the years. I make it the same way my mom makes it, my grandma before her and my great grandma. This was the first recipe I made when I was a poor college student. I would splurge when chuck roast was on sale and make a pot of soup and eat it all week.
This is true comfort food. I have a few standard ingredients I always put in the soup, but the rest of the stuff is just what I have on hand. I clean out the vegetable bin in the fridge and add whatever I think will taste good.
The soup starts out the day before as a pot roast in the crock pot. I usually cook a 3-4 lb chuck roast in the crock pot with carrots, celery, onions, garlic and a can of beef stock. We have roast for dinner and I use the leftovers for soup. Even if I a not going to make the soup right away, I freeze the leftover roast, including pan drippings and cooked vegetables for soup making later.
The soup pairs well with crusty bread or homemade yeast rolls. It is even better the day after you make it, as most soup is.
Beef Vegetable Soup
1 - 2 lb cooked roast and any veggies (from leftover pot roast), chopped into smallish chunks
about 32 oz beef broth, either homemade or store bought
14 oz can stewed tomatoes
3 carrots, peeled and sliced into rounds
3 potatoes, peeled and cut into large dice
3 celery stalks, chopped
bag of frozen soup vegetables (I buy the soup medley mix)
small head of cabbage, chopped
small white onion, diced
1 bay leaf
pinch of Italian seasoning or Herbs de Provence
salt/pepper to taste
any other misc veggies you want to add
(broccoli, asparagus, mushrooms, etc, I clean out the vegetable bin and add what I want to use up)
water
In a large stock pot, place the meat, all of the vegetables, the stewed tomatoes, bay leaf, spice, salt & pepper, beef broth and enough water to just cover the vegetables.
Heat the pan to boiling and then turn the heat down to low. Cover and let simmer on low heat for about 2 hours.
Don't worry about the soup pot looking crowded with too many veggies, they will put off liquid as they cook and shrink down. Season to taste and serve. Makes excellent leftovers and can be frozen for future use.This recipe makes a generous amount of soup. At least enough for 8 -10 servings. Freezes well.
Friday, November 20, 2009
White Chocolate, Cranberry & Ginger Cookies
I have had cookies on my mind all day. I started thinking about what kind of cookie I was gonna make at 10:30 this morning. I was leaning towards chocolate chip but I'm making a Kentucky Derby pie tomorrow for a pie off, and I'll get my chocolate fix then. I decided to be reasonable and make recipe from Eating Well. I first made these cookies when I was big into Weight Watchers last year, no pun intended. These cookies don't taste like a healthy cookie, but since you are not using butter, they are relatively low in fat and calories.
These are excellent with a cup of tea or still warm with a glass of milk. The crystallized ginger gives the cookies a nice little spicy bite. The recipe makes 2 dozen small cookies. I made my cookies a bit larger and got 14 good sized cookies out of the recipe.
White Chocolate, Cranberry & Ginger Cookies
1 cup all-purpose flour
1/4 cup wheat germ
1/2 teaspoon baking soda
1/2 teaspoon salt
1/4 teaspoon ground ginger
1/4 teaspoon cinnamon
1 large egg
3/4 cup packed dark brown sugar
1/3 cup canola oil
1 teaspoon vanilla extract
1/2 cup oats, quick-cooking or old-fashioned (not instant)
2 ounces white chocolate, chopped (I used Ghiradelli white chocolate chips)
1/3 cup dried cranberries
1/4 cup crystallized ginger
Preheat to 375°F.
Whisk flour, wheat germ, baking soda, salt, cinnamon and ground ginger in a small bowl.
Whisk egg, brown sugar, oil and vanilla in a large bowl. Add the dry ingredients to the wet ingredients; stir to combine.
Add oats, white chocolate, cranberries and crystallized ginger; stir just to combine.
Drop by rounded tablespoonfuls onto 2 ungreased baking sheets, 1 1/2 inches apart.
Bake the cookies until puffed and barely golden around the edges, about 11 - 12 minutes. Cool on the pans for 2 minutes; transfer to a wire rack to cool completely.
Subscribe to:
Posts (Atom)